DNS configuration guide
This guide explains how to configure the DNS records of your domain for three popular registrars: Namecheap, GoDaddy, and Amazon Route 53.
The steps in this guide are prerequisites to using a custom domain. You must complete this DNS configuration before following the "using custom domains" guide.
To illustrate these required configurations, the apex domain ic-domain.live and the subdomain example.ic-domain.live are used.
Replace ic-domain.live with your own domain, such as my-website.com.
Namecheap
Below are the steps to configure the apex of a domain and a subdomain on Namecheap to be used as a custom domain for a canister deployed on ICP.
Step 1: After purchasing your domain on Namecheap, open the management panel of your domain in the Namecheap dashboard.
Step 2: Open the Advanced DNS tab.
Apex
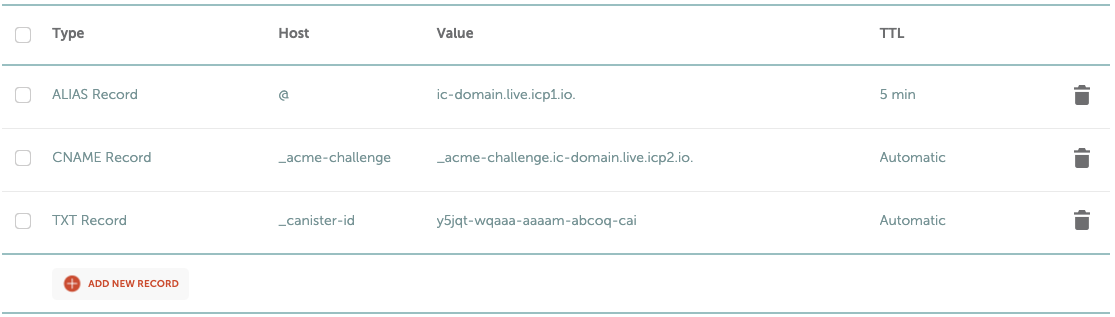
To configure the apex of the domain (e.g., ic-domain.live), add the following records by clicking on Add new record:
Create an
ALIASrecord for which you set the host field to@and the target field toic-domain.live.icp1.io.Create a
CNAMErecord for which you set the host field to_acme-challengeand the target field to_acme-challenge.ic-domain.live.icp2.io.Create a
TXTrecord for which you set the host field to_canister-idand the value field to the canister IDy5jqt-wqaaa-aaaam-abcoq-cai.
The resulting configuration should look similar to the following screenshot:
Subdomain
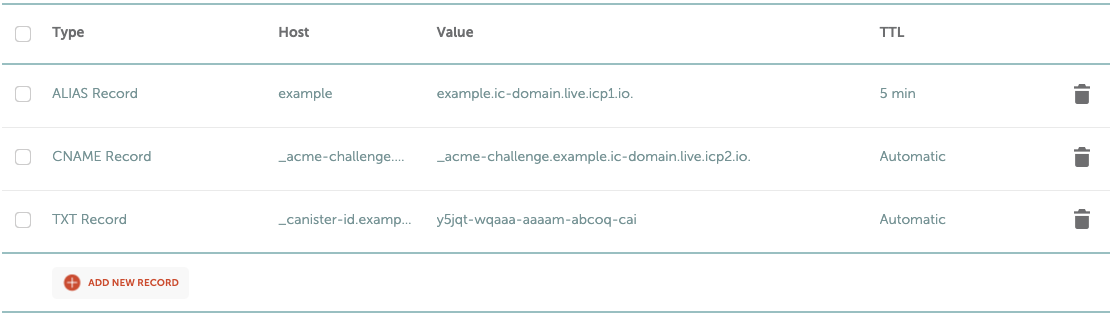
To configure a subdomain (e.g., example.ic-domain.live), add the following records by clicking on Add new record:
Create an
ALIASrecord for which you set the host field toexampleand the target field toexample.ic-domain.live.icp1.io.Create a
CNAMErecord for which you set the host field to_acme-challenge.exampleand the target field to_acme-challenge.example.ic-domain.live.icp2.io.Create a
TXTrecord for which you set the host field to_canister-id.exampleand the value field to the canister IDy5jqt-wqaaa-aaaam-abcoq-cai.
The resulting configuration should look similar to the following screenshot:
Now, you are all set to register your custom domain with the HTTP gateways, and you can continue with step 2 of the general custom domains instructions.
GoDaddy
Below are the steps to configure the apex of a domain and a subdomain on GoDaddy to be used as a custom domain for a canister deployed on ICP.
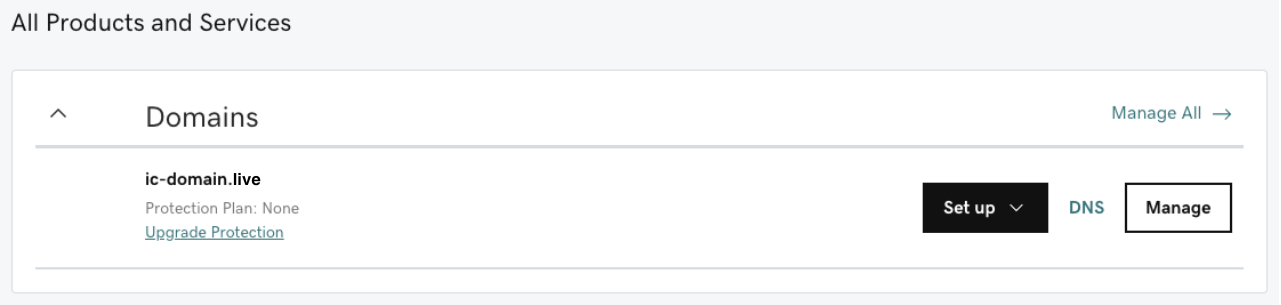
Step 1: After purchasing your domain on GoDaddy, open your account and navigate to My Products.
Step 2: Click on the DNS button next to the domain.
Apex
Unfortunately, GoDaddy does not support configuring a CNAME record (or one of its alternatives, ALIAS or ANAME) for the apex of the domain; you need to make use of a workaround.
There are two options:
Directly configuring the IP addresses is simpler compared to relying on another DNS provider, but is less resilient and performant. Therefore, it is advised to use a different DNS provider (e.g., Cloudflare or Route 53).
Rely on an alternative DNS provider (recommended)
It is explained in this approach using Cloudflare as a DNS provider. It works similarly with any other DNS provider that supports CNAME, ALIAS, or ANAME records for the apex of a domain.
Step 1: Create a free account with Cloudflare; click on Add site in the top bar of the dashboard.
Step 2: Enter your domain (e.g.,
ic-domain.live) and click Add site.Step 3: Choose the free plan and continue.
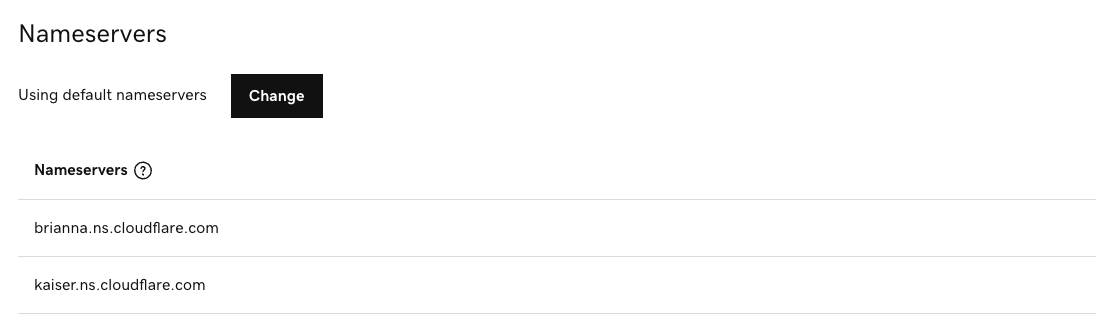
Step 4: In the next step, Cloudflare lists two nameservers that you should configure GoDaddy to use.
Take note of the two nameservers (e.g.,
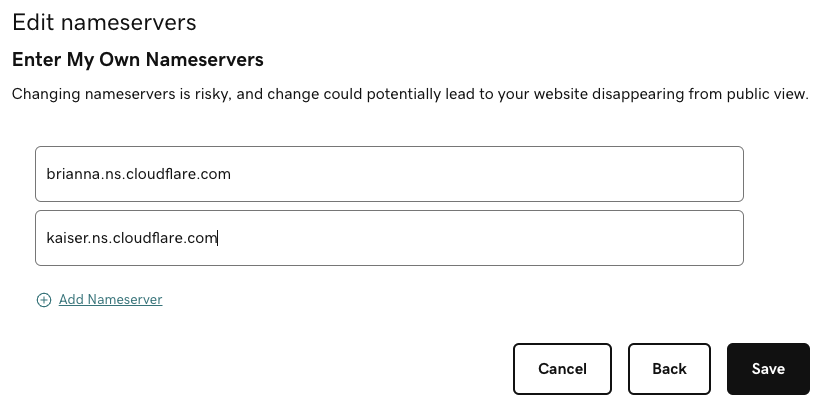
brianna.ns.cloudflare.comandkaiser.ns.cloudflare.com) provided by Cloudflare.Step 5: In the DNS Management panel of GoDaddy, remove all DNS entries on GoDaddy.
Go back to your DNS settings on GoDaddy and make sure to remove all the DNS entries that GoDaddy created.
Step 6: Click on the Change button in the Nameservers section.
Step 7: In the dialog that opened, click on Enter my own nameservers (advanced) and fill in the nameservers from Cloudflare in the provided fields.
To finish, click on Save.
Step 8: Confirm in the dialog that you indeed intend to change the nameservers.
The resulting configuration should look similar to the following screenshot:
Step 9: Back in the Cloudflare management portal, click on Done, check nameservers.
This step can take several hours, and you will be notified by email once it succeeded.
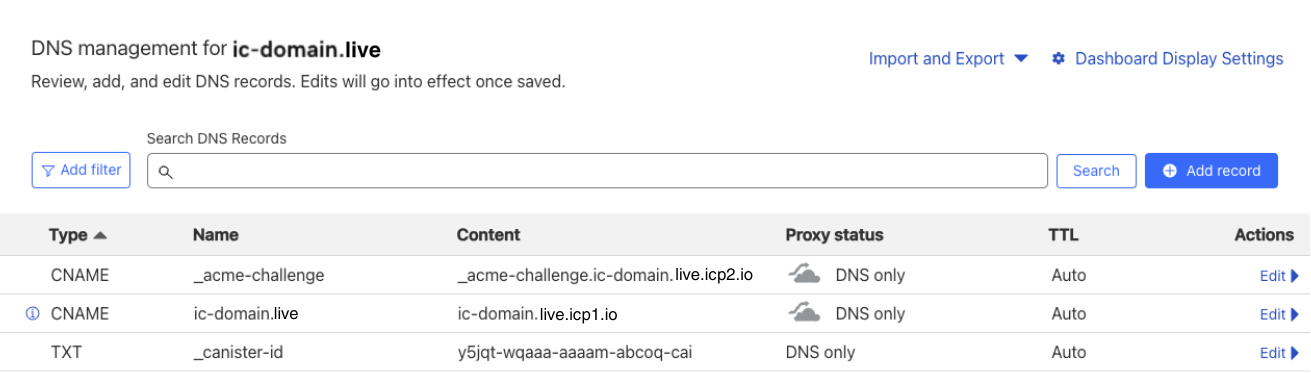
Step 10: On Cloudflare, add the following records to configure your domain:
Create a
CNAMErecord for which you set the name field to@and the target field toic-domain.live.icp1.io.Create a
CNAMErecord for which you set the host field to_acme-challengeand the target field to_acme-challenge.ic-domain.live.icp2.io.Create a
TXTrecord for which you set the name field to_canister-idand the content field to the canister IDy5jqt-wqaaa-aaaam-abcoq-cai.
The resulting configuration should look similar to the following screenshot:
Directly configure the IP addresses (not recommended; use at your own risk).
By directly configuring the IP addresses of the HTTP gateways, you always need to make sure to keep your DNS records up-to-date. If a HTTP gateway is retired or changes its IP addresses, you need to remove or update your DNS records. Otherwise, you risk that your dapp becomes inaccessible.
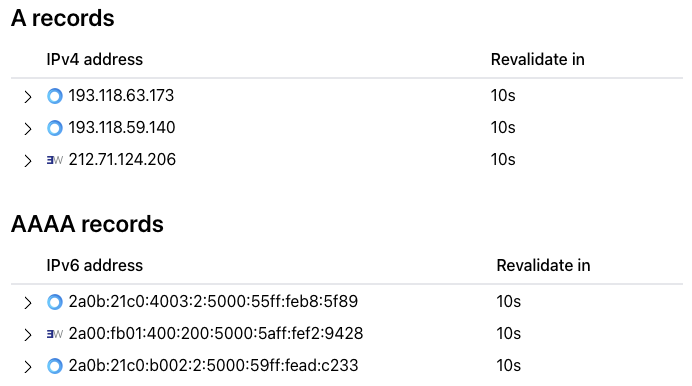
Step 1: First, you need to look up the IP addresses of the HTTP gateways (
To this end, use an online DNS lookup service (e.g., nslookup.io) and take a note of the IPv4- and IPv6-addresses, theicp1.io).AandAAAArecords, respectively.
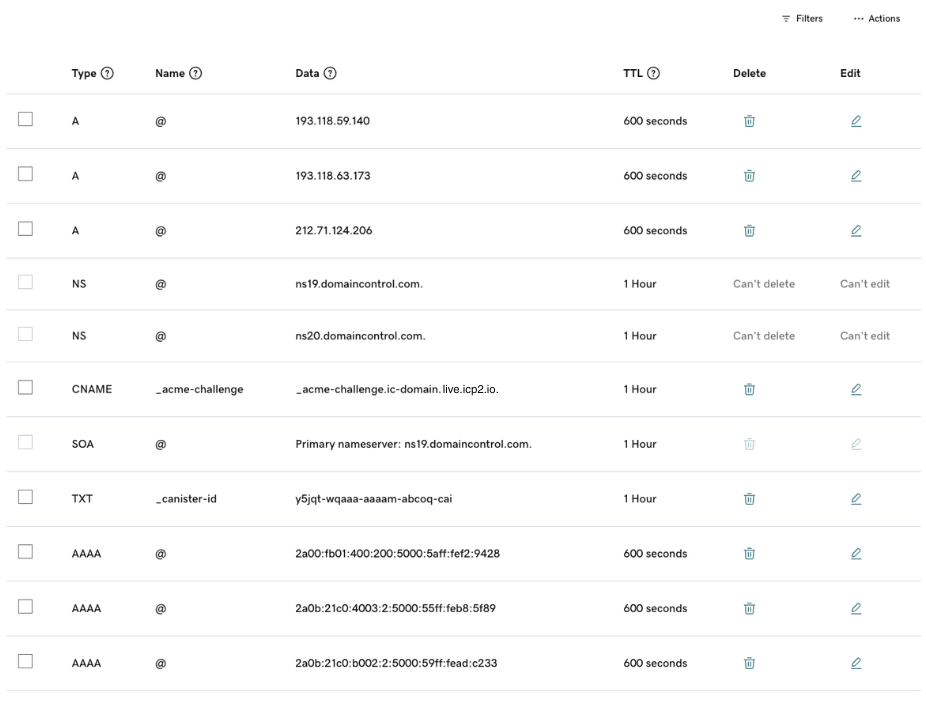
Step 2: In the DNS Management panel in your GoDaddy account, add the following DNS records:
Create an
Arecord for each IPv4 address by setting the name field to "@" and the value field to the IPv4 address (e.g.,193.118.63.173).Create an
AAAArecord for each IPv6 address by setting the name field to "@" and the value field to the IPv6 address (e.g.,2a0b:21c0:b002:2:5000:59ff:fead:c233).Create a
CNAMErecord for which you set the name field to_acme-challengeand the value field to_acme-challenge.ic-domain.live.icp2.io.Create a
TXTrecord for which you set the name field to_canister-idand the value field to the canister IDy5jqt-wqaaa-aaaam-abcoq-cai.
The resulting configuration should look similar to the following screenshot:
Subdomain
To configure a subdomain (e.g., example.ic-domain.live), add the following records by clicking on Add new record:
Create a
CNAMErecord for which you set the host field toexampleand the target field toexample.ic-domain.live.icp1.io.Create a
CNAMErecord for which you set the host field to_acme-challenge.exampleand the target field to_acme-challenge.example.ic-domain.live.icp2.io.Create a
TXTrecord for which you set the host field to_canister-id.exampleand the value field to the canister IDy5jqt-wqaaa-aaaam-abcoq-cai.
The resulting configuration should look similar to the following screenshot:
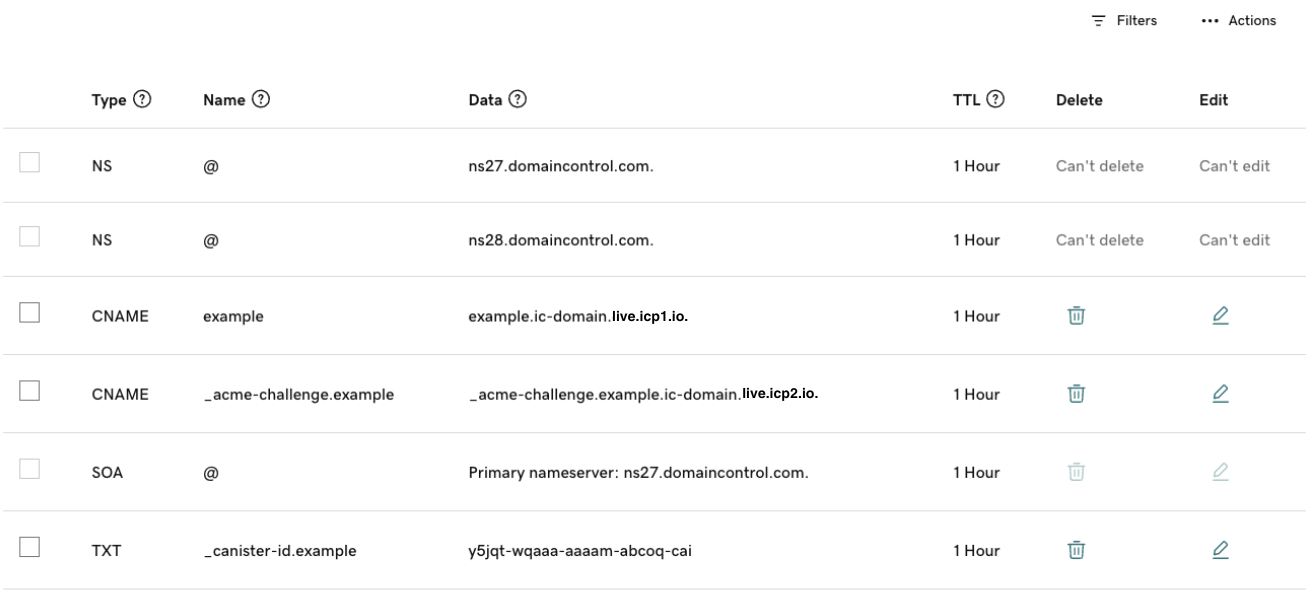
Now, you are all set to register your custom domain with the HTTP gateways, and you can continue with step 2 of the general custom domains instructions.
Amazon Route 53
Below are the steps to configure the apex of a domain and a subdomain on Amazon Route 53 to be used as a custom domain for a canister deployed on ICP.
Apex
Unfortunately, Amazon Route 53 does not support configuring a CNAME record (or one of its alternatives, ALIAS or ANAME) for the apex of the domain. You need to make use of a workaround.
For instructions, take a look at the steps outlined for GoDaddy under "Rely on an alternative DNS provider".
Subdomain
Step 1: After purchasing your domain on Route 53, navigate to Hosted zones and click on your domain.
Step 2: Click on the domain to open the DNS settings.
Step 3: Configure your DNS records.
To configure a subdomain (e.g.,
example.ic-domain.live), add the following records by clicking on Create record:
Create a
CNAMErecord for which you set the host field toexampleand the target field toexample.ic-domain.live.icp1.io.Create a
CNAMErecord for which you set the host field to_acme-challenge.exampleand the target field to_acme-challenge.example.ic-domain.live.icp2.io.Create a
TXTrecord for which you set the host field to_canister-id.exampleand the value field to the canister IDy5jqt-wqaaa-aaaam-abcoq-cai.
The resulting configuration should look similar to the following screenshot:
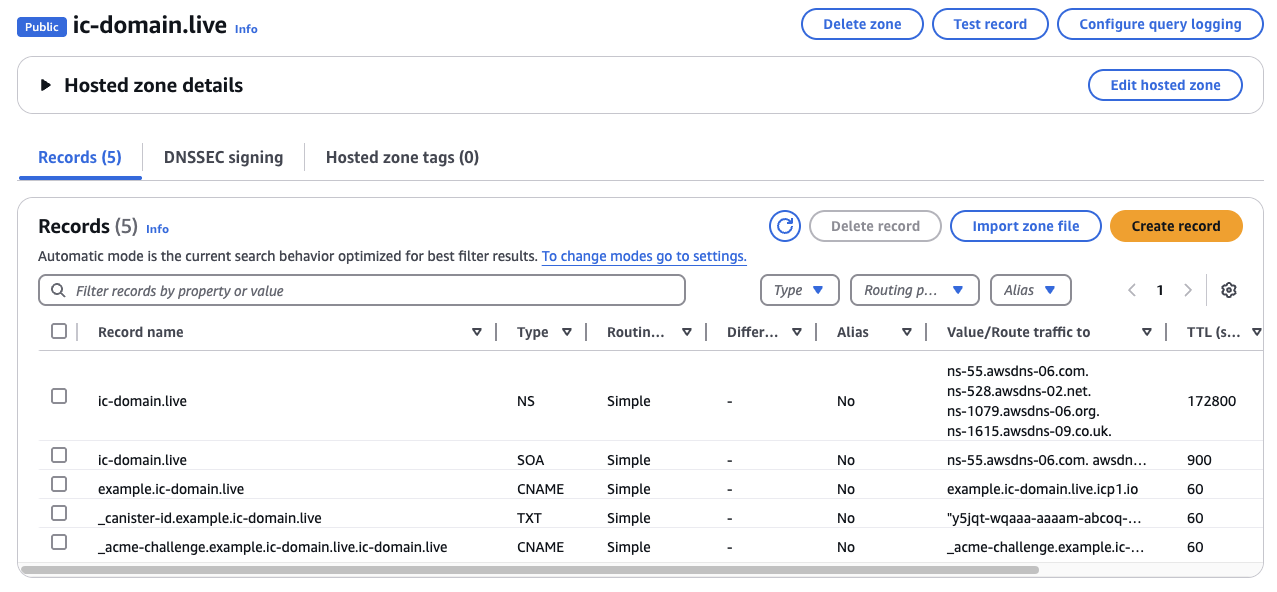
Now, you are all set to register your custom domain with the HTTP gateways, and you can continue with step 2 of the general custom domains instructions.
Cloudflare
When using Cloudflare as DNS provider, you need to apply the following settings such that the custom domain works as intended and does not fail to renew:
- Under SSL/TLS > Edge Certificates at the very bottom, you have to disable "Universal SSL".
- You should not proxy traffic through Cloudflare ("DNS only").